Using the online Georeferencer
- Input options: Zoomable online images
- Output options: A georeferenced KML or KMZ file
- Strengths / weaknesses: An easy, basic and free process. The Georeferencer application offers more limited transformation and output options than ArcGIS or Quantum GIS, but is under active development
The Georeferencer pilot application offers an easy and enjoyable way to georeference historical maps, so that they can be displayed as an overlay in Google Earth and the Google Earth browser plug-in.
You will need to enable Javascript in your web browser, as well as have the Google Earth browser plug-in installed. We also recommend that you have Flash and Google Earth installed, but these are not essential.
- Select the map you would like to georeference by clicking on it to enlarge it. (The selected map can also be shared in Facebook and Twitter using the
 and
and  buttons).
 - Click on the selected map, or
 to open the item in Georeferencer.
 - You will be prompted to register in Georeferencer with your e-mail address and a password. This can be done at: http://nls.georeferencer.com/user/register. For initial registration you will receive a confirmation email with a link you have to visit before you can login for the first time. Registration is quick and simple and allows us to manage and control Georeferencer better.
Option 1. Using NLS Georeferencer
- Follow the instructions at www.georeferencer.org to identify a zoomable image and paste this into the Georeference box
Option 2: Using georeferencer.org
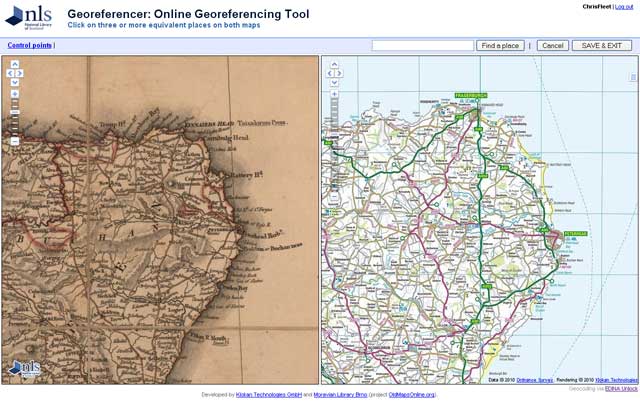
- Once logged in, the historic map to be georeferenced is shown on the left-hand side.
The mapping on the right-hand side is for placing Control Points (see Section 6 below).

Historic map to georeference on the left Modern mapping on the right
The default mapping on the right-hand side is modern Ordnance Survey Opendata. It is possible to change this to the NLS historical mapping from the 1930s, and modern OpenStreetMap, Google and Bing mapping and satellite imagery by clicking on the icon on the far right side and selecting your preferred map layer.
 - The right-hand map can also be navigated by using a place name search – this uses the EDINA Unlock gazetteer of place names. Just type a place name in the box, click the 'Find a Place' button, and if the name is in the gazetteer, the map should be repositioned with this place at the centre.
- Georeferencing involves placing at least three Control Points (more for a better fit) in both windows. Control Points are simply the same known location that you place on both the historical and the modern map.
Zoom in (by double-clicking with your mouse or using the vertical slider) on either window and click once on the map to place a Control Point on your chosen location. Zoom in the other window to place the Control Point on exactly the same location.
If you make a mistake, Control Points can be moved by clicking and dragging them to their correct location. Control Points can be deleted by hovering over the Control Point with your mouse pointer and pressing the Delete button on the keyboard. When you have placed your Control Points, the georeferenced map can be saved by selecting the SAVE & EXIT button. - The historical georeferenced map will then appear as an overlay in the Google Earth browser plug-in. You can also choose to display the georeferenced map in Google Earth..
In the Google Earth browser plug-in, there are various options in the header at the top of the page. The historical georeferenced map can be turned on or off by selecting the 'Toggle visibility of overlay map' option. It is possible to download KMZ and World Files from the www.georeferencer.org website. Choose the 'Improve the georeference' option to georeference the map further by altering or adding more control points (see Sections 4-6 above).