Georeferencing maps
Drawing features
Putting maps online
Drawing lines, points or polygons (vectors) in QGIS
- Input options: Any georeferenced image file (view list) or WMS layer (view list) containing features you would like to trace.
- Output options: A shapefile or KML file with vector features.
- Strengths / weaknesses: QGIS is simple, free, open-source software
- Open the georeferenced image (Layer > Add Raster Layer) or WMS layer (Layer > Add WMS Layer) in QGIS.
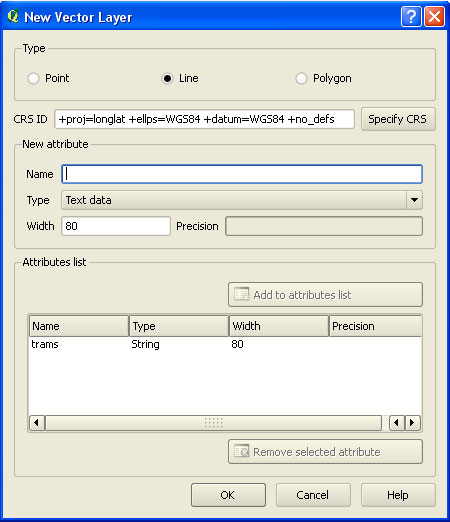
- Select Layer > New > New Shapefile Layer to create the new empty layer for your vector feature. You will be prompted to confirm the Coordinate Reference System for the layer. By default, the Coordinate Reference System for the project is used, but you can overide this if you wish. Read more about Coordinate Reference Systems.
- You will then be prompted to confirm:
- The Type of feature you are tracing - point, line or polygon
- The Name of the Attribute you are tracing
- The Type of the Attribute - eg. Text, Whole Number
- The Width of the field for the Attribute. Select Add to Attribute list
- The Shapefile Name to save the layer as

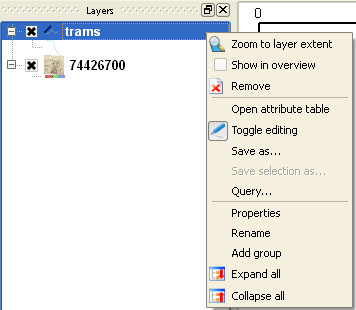
- The shapefile will be added to the Table of Contents panel on the left hand side. RIGHT click on the layer to bring up a menu of options connected to it.

- To add or edit features, select the Toggle editing button
 or RIGHT click on the shapefile layer in the Table of Contents and select Toggle editing.
- For capturing points:
- Click on the Capture Points button

- Click points at your chosen location, and choose a name for each point feature
- Click on Toggle editing to save the vector point layer
- For capturing lines
- Click on the Capture Line button

- Click a set of points along the line. RIGHT click when you have reached the final point to finish, and choose a name for the line feature
- Click on Toggle editing to save the vector line layer
- For capturing polygons
- Click on the Capture Polygon button

- Click a set of points along the perimeter of the polygon. RIGHT click when you have reached the final point to finish, and choose a name for the polygon
- Click on Toggle editing to save the polygon layer
- For editing points, lines and polygons:
- The Move Feature button
 allows a whole feature to be moved to a new position
- The Node tool
 allows you to select the feature and move one of the points to a new position
- RIGHT click on the layer in the Table of Contents and select Open attribute table to view and edit the information connected to the features
- RIGHT click on the layer in the Table of Contents and select Query to select features in the layer
- RIGHT click on the layer in the Table of Contents and select Save As to save the layer in a number of formats, including Keyhole Markup Language. Vector features can also be converted and reprojected using the ogr2ogr command
- You can save your current open layers and features at any time by using the Save Project button

 or RIGHT click on the shapefile layer in the Table of Contents and select Toggle editing.


 allows a whole feature to be moved to a new position
 allows you to select the feature and move one of the points to a new position